Skip to content

5 Minute Fix to Troubleshoot a Diaphragm Pump

Air-operated double diaphragm pumps (AODD) are preferred in transfer applications due to a simple design that makes
them easy to operate and cost effective to repair. But it is important to install and operate the pump correctly to achieve
top performance. Highlighted below are six quick and easy fixes to common problems you may encounter during
installation and operation.

Step 1. Check the Inlet Air Line Size and Pressure 

Installing too small of an air line is the most common mistake relating to an AODD pump. By using too small of an air
line, you are starving the pump of the fuel – compressed air – it needs to operate at peak performance. Double
diaphragm pumps come in all shapes and sizes, based on the application and fluid requirements. Larger AODD pumps,
one inch and greater, require more compressed air and larger air lines to operate at full capacity compared to smaller
pumps. You can find the appropriate air line size for your pump in the manufacturer’s installation and operation
manuals. As a general guideline for AODD inlet air line sizes, it is best practice to match the air line hose size to the air inlet port size on the air valve.

Inlet air pressure also plays a key role in getting the
most out of your pump. Diaphragm pumps operate
on a 1:1 ratio, meaning the pressure of the inlet air
you feed the pump is directly related to the fluid
pressure at the outlet of the pump. For example, if
the target outlet pressure of a 1 inch, 50 gpm pump
is 100 psi, the inlet air pressure entering the air
valve of the pump must be greater than or equal to 100 psi.

System back pressure and fluid viscosity will impact
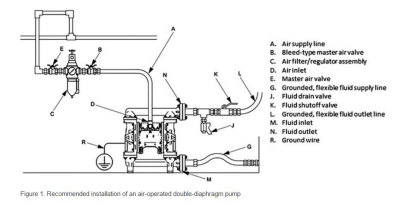
the outlet fluid pressure. Too little back pressure may cause the pump to run inefficiently because the ball checks may not check as quickly. Too much back pressure can cause the pump to stall if the fluid pressure overcomes the air pressure to the pump. To control the performance (flow and pressure) of an AODD, it is important to have an air regulator assembly installed to control the incoming air pressure (see Figure 1, C). Installing the correct air line size with an air regulator will solve the most common installation problem found with AODD pumps.

Step 2. Inspect for Muffler Icing and Restrictions

Diaphragm pumps can generate high decibel levels at full speed, which is why mufflers are included and recommended
at install. The AODD air motor requires compressed air to operate. As the compressed air enters the air valve and is channeled through the pump center section to exhaust through the muffler, rapid changes in temperature occur. At the muffler exhaust, air temperature is well below freezing and can cause icing-related issues, increasingly common in humid environments. If your pump is operating erratically, or if the inlet air has high levels of moisture or you see frost on the outside of your muffler, these are all indications you are having an issue relating to icing that is decreasing your pump efficiency. Suggested below are solutions you may implement to eliminate these issues and restore your pump performance.

 Decrease the air pressure to the pump
 Increase size of pump to operate at lower speed (i.e., lower air pressure)
 Exhaust the air to a remote location via an exhaust port tube
 Add an air line filter with a water catcher and drain to collect condensation
 Install an air line heater, raising the exhaust air temperature above freezing
 Adjust pressure dew point temperature with an air compressor dryer 

Step 3. Inspect Sealing Surfaces for Leaking 

Leaking is a very common problem in all types of pumps. But there are some simple fixes to ensure the fluid stays in your AODD pump and not on the ground. First, it is important to know that pumps, especially plastic pumps, need to be
torqued to the manufacturer’s recommended rating. Reason being, materials relax over time, often referred to as cold flowing, which can cause sealing surfaces to loosen and create leak paths. Always refer to the pump manual for torque values and follow the bolting patterns illustrated to reduce the threat of leakage. A wise maintenance technician once said, “There are two types of pumps – those that leak and those that are going to leak.” Reuse of PTFE O-rings is another cause of leaking at sealing surfaces. PTFE is a versatile material, but one of its downfalls is resilience. Once a PTFE O-ring has been compressed, it is not capable of regenerating its original shape. So replace all pump PTFE O-rings when servicing an AODD pump. After properly torqueing your pump per manufacturer recommendations and ensuring all sealing O-rings have been replaced after service, your AODD should be leak-free.

Step 4. Ensure Proper Tubing and Piping Size 

Pump inlet and outlet fluid port diameters vary based on the flow rate required. It is critical that inlet and outlet hose sizes match the size of the pump. Of primary concern is the risk of cavitation and the negative effect it has on the pump, causing more frequent repairs and higher maintenance costs. For example, if a 1 inch pump has a ½ inch inlet hose connected, the pump will not be able to operate at full capacity without the risk of cavitation. This risk increases dramatically as the desired fluid viscosity rises. In this example, the 1 inch pump should have a 1 inch inlet and outlet hose attached to avoid cavitation and more frequent, costly repairs. It is also recommended that an AODD pump be installed with a flexible inlet/outlet connection rather than being hard plumbed. As pump speed increases, vibration increases. As vibration increases, the risk of loosening a hard plumb connection increases, creating the potential for leaking.

Step 5. Slow the Pump Down to Prime 

AODD pumps are popular when self-priming is required. Creating a low pressure zone, less than the atmospheric pressure of 14.7 psi, inside the fluid bowls is how the AODD pump draws fluid. If the air pressure supplied to the pump is too high, this will cause the pump to changeover too quickly and not allow enough time for the fluid to be drawn into the pump. To solve this priming issue, use the air regulator to decrease the air pressure entering the air valve and slow down the pump. Once the pump speed has been reduced and the fluid has been provided enough time to enter the pump, you can increase the air pressure and operate the pump at a faster speed.

Step 6. Clear any Fluid Line Restrictions 

The last step to ensure optimal pump performance is to clear any fluid line restrictions. These restrictions create back pressure that may negatively affect the pump and potentially create cavitation that will increase frequency of maintenance. Things to look for at both the inlet and outlet of the pump:
 Closed or partially closed valves
 Clogs or kinks in the line
 Too much hose or length of distance

Conclusion 

These quick fixes will solve most of the common problems you may encounter with an AODD pump. Remember to listen to the pump. Many times, carefully listening to the pump operate will tell you what you need to do to reach optimum pump performance levels. Listen for erratic operation, which may be caused by an inlet hose that is too small or a problem relating to icing. If you hear what sounds like gravel running through the pump or you see flashing around the manifold elbows, you are cavitating and need to correct the inlet or outlet tubing size or reduce the pump speed to minimize unnecessary maintenance. Keep an eye out for kinks in your inlet and outlet lines or any valves that could be closed or restricted. With these tips, you will achieve top performance out of your AODD pump and spend less time trying to figure out problems and more time pumping.

If you want more information, contact us by phone or email.